How Tos
How to Screenshot On Mac [3 Different Ways]
If you’re in the need of taking an image on a Mac You might be trying to find the “Print Screen” button like on certain keyboards.
However, taking a screenshot with the Apple machine is more complicated than taking a snapshot on the Windows machine. Taking a screenshot on a mac isn’t as easy as pressing a button called, “Print Screen”
If you are using Windows PC, all you have to do is hit”PrtScr” or the “PrtScr” or “Print Screen” key on your keyboard. Once you have pressed that option, Windows OS will automatically create a photo of your screen full-size image and save it on the clipboard.
To save or export this screenshot as an image file you’ll need help from a photo editor program like Microsoft Paint or Photoshop.
Simply copy the contents from the clipboard into Paint in the Paint program (or click Ctrl + V ) then save the file as a new file.
But how do you capture an image on the Mac? This article will walk you through three keyboard shortcuts that can capture different kinds of screenshots on your Mac.
Print Screen Option on Mac
In Mac OS X, there are more advanced features for printing on the screen. In reality, there are three ways to capture a screenshot from your Mac:
- Snap a picture of the entire screen.
- Make a screen capture of a specific area or screen.
- Take an image of the selected application.
There are many ways to take a snapshot then save the image to your computer, without using an editor for photos (unlike the case with a computer).
There are three basic combinations you can choose from to print a screen on your Mac computer. You can capture a picture.
Every keystroke is designed to do its job to take an entire screen, a portion of the screen, or the screenshot of an application, based on the keys you press.
How can you screenshot on the Mac Make A Screenshot Of The Whole Screen
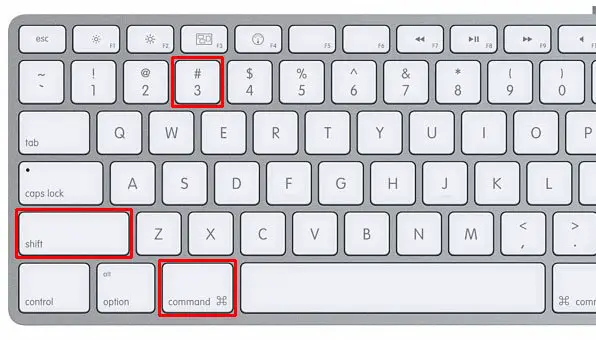
If you’d like to take pictures of the entire screen, follow this shortcut:
Command + Shift + 3
If you hold Command, Shift, and 3 your Mac computer will take the entire screen. You can save the image to your computer.
If you have multiple monitors This shortcut will generate an image file that is larger, that includes all monitors connected.
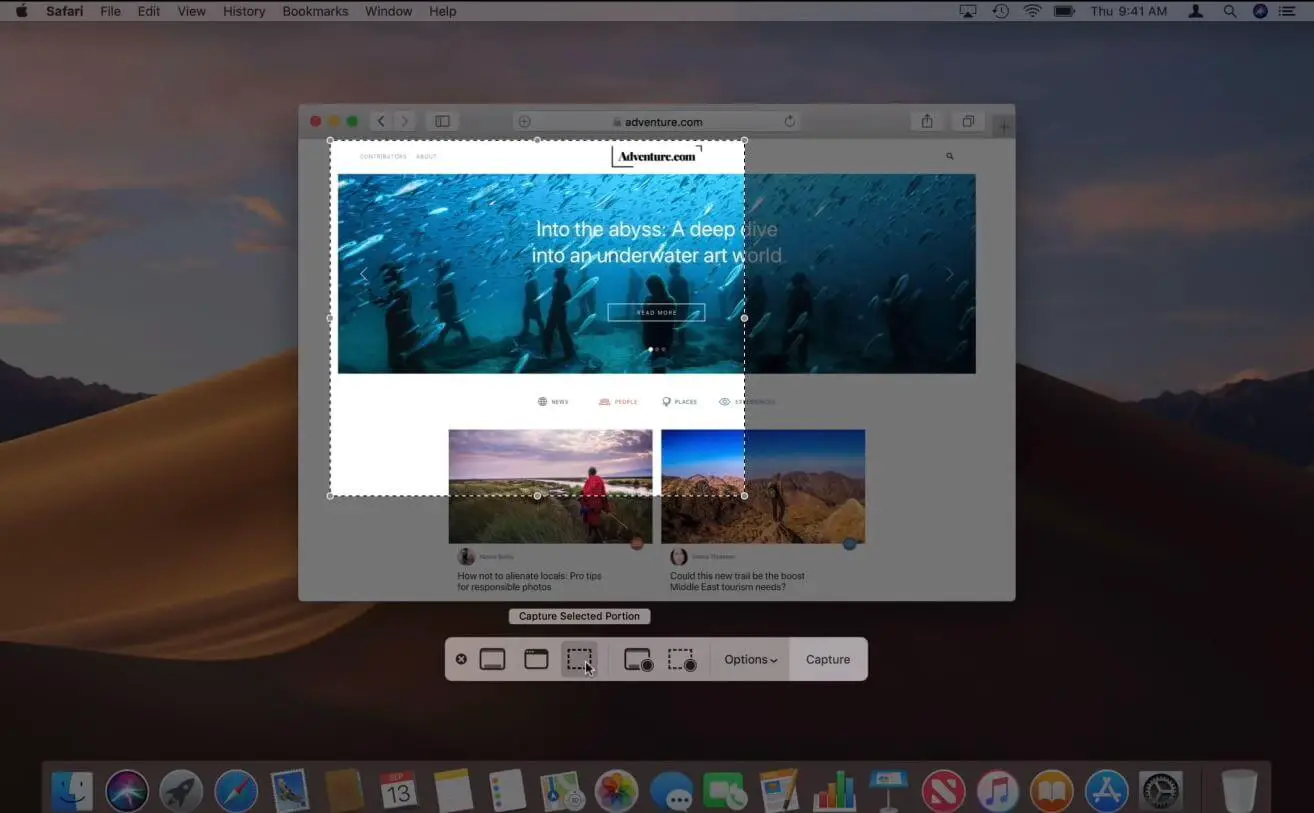
Make a Screenshot from Just the Part of Your Screen
If you are only looking to take a picture of a part of the screen, you can use this keystroke:
If you use the keys above, a select box will appear, which allows you to select the specific area of the Mac screen to record. Then, it saves it as a photo file and saves it to the Desktop of your Mac.
Here are the full instructions on how to create a Mac screen of a selected region:
- Hit Command + Shift + 4 Your mouse cursor will transform into the crosshair.
- Place your cursor in the exact position you’d like to take the image.
- Drag the mouse to select an area, after that, release your mouse. The screen will be automatically taken.
When you drag the crosshair, you can hold it. Shift, Option, Or Space You can change the way you decide which part of your screen you wish to take a screenshot of.
If you’ve chosen one of the areas that are on the Mac screen, but are not sure and would like to select another part you can simply hit Esc to exit.
Take Screenshots of A Particular Window
To take a screenshot of an application you want to take a screenshot of on the Mac OS X computer, follow these steps:
- Use these keys simultaneously at the simultaneously: Command + Shift + 4 .
- When you press these keys, the cursor of Mac changes into ” +“.
- The next step is to press Spacebar (or Space If you press the key) when you press it, the cursor will transform into an image of a camera.
- Simply move the camera icon then click on the app you’d like to take the picture.
Finding a Screenshot File
In all these methods the image will automatically be saved on your desktop of Mac as PNG files (as opposed to a JPG) that has the name of “Screen Shot”xx-xx-xx”. The “xx-xx-xx” numbers were created in a way based on the date and the time the image was taken.
If you don’t wish to overflow your desktop or the Finder, then you can alter where in which screenshots are saved with your Mac commands terminal.
If you’re using an operating system that is newer, such as Mojave the functions may be somewhat more sophisticated however the fundamental keystrokes are exactly the same.
Are you looking for a new feature in addition to the traditional print screen on your Mac? These are the top five screen capture applications to assist you in taking more sophisticated screengrabs with your Mac.
Test these apps and you may find yourself wanting to use them more often than making keyboards.


Why Did iMessage Turn Green Explained!
You may have noticed that text messages in the Messages app on your iPhone can be green or blue. What’s...

How To Fix Microwave Interferences With WiFi
Are you experiencing constant WiFi problems with interference? Your microwave could be your culprit! Repairing microwave interference in the WiFi signal...

How To Fix This Webpage Is Not Available Error In Google Chrome
This page isn’t accessible is among the most frustrating problems on Google Chrome that many internet users are facing. If this error...

What is Android System WebView? Should You Delete it?
You may have encountered the Android System WebView when you were updating your apps in the Play Store. It is possible that...

How To Fix System Thread Exception Not Handled Error
A helpful step-by-step guide to assist you in fixing the System Thread Error Not Handled error in Windows OS. If you are...
-
Explained7 months ago
Why Did iMessage Turn Green Explained!
-
 List7 months ago
1337x Proxy List For 2022 [100% Working 1337x Mirror Sites]
-
 How Tos7 months ago
How To Get A Specific Phone Number for yourself?
-
 List3 years ago
11 Best Music Players for Android Auto
-
Explained7 months ago
What is Android System WebView? Should You Delete it?
-
 Explained7 months ago
How Can Monitors Be Connected By USB? (Explained)
-
How Tos7 months ago
How To Fix This Webpage Is Not Available Error In Google Chrome
-
 Gaming7 months ago
Neal Fun Spend: Spend Bill Gates and Elon Musk Money